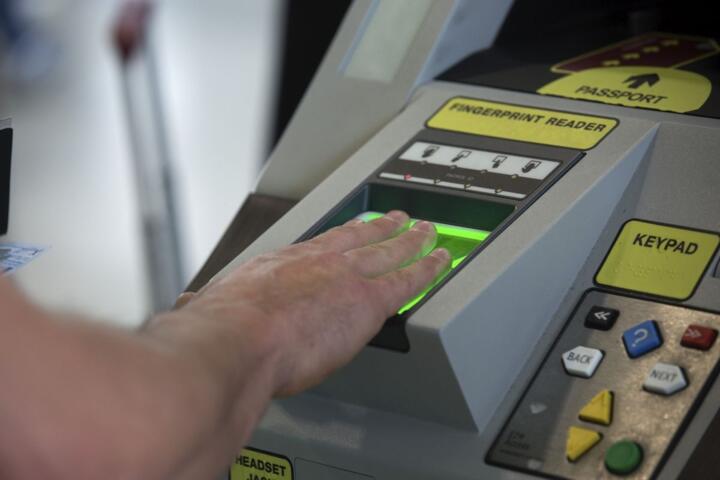
Biometric Border Control Basics
Biometric border control in the EU uses facial images and, in many cases, fingerprints to verify identity against travel documents. At airports, you typically encounter automated gates or e-gates that read your passport’s chip and compare your face to the image stored in the document. If the match is not accepted, staff may take over for manual checks.
For a first EU flight, the practical difference is that you follow a process rather than waiting in a general queue. You scan your passport at the kiosk or gate, look at the camera when prompted, and then proceed when the system grants entry. Some airports also use e-gates for EU/EEA/Swiss travelers and separate lanes for other categories, so your eligibility affects which lane you should use.
EU border systems are built around the Schengen Area framework for people who enter and move within participating countries. Your travel document category and your route matter: a direct flight into a Schengen country can trigger different checks than a connection through a non-Schengen airport. If you arrive with a passport that has an electronic chip, the gate can read it faster than a document that requires more manual handling.
One small detail that often gets missed: some gates require you to remove bulky items from your face area, like hats or large sunglasses, before the camera scan. I’ve seen travelers get stuck on the “face not detected” message because they were still wearing a hood, and the system kept asking again.
Common Problems And Pain Points
People usually get delayed for predictable reasons, not because the system is “unfair.” The most common issue is a mismatch between the live face image and the reference image in the passport chip. That mismatch can happen when lighting is poor, the traveler’s appearance changed since the passport photo, or the camera cannot capture a clear face.
Another frequent problem is misunderstanding which lane to use. If you choose the wrong queue, you may reach a gate that cannot process your document type, and you’ll be redirected. This is especially common when travelers mix up EU/EEA/Swiss eligibility with non-EU entry rules, or when they assume every airport uses the same gate logic.
Document readiness also causes friction. A passport with damage, a worn chip, or a cover that blocks scanning can lead to repeated read attempts. Fingerprint checks can fail when hands are dry, injured, or covered with residue like sunscreen; the system may ask you to re-place your fingers, and it rarely works the way the signage suggests.
Supporting technologies matter because they drive the user experience. The gate relies on passport chip reading (for e-passports), biometric capture hardware (camera and fingerprint reader), and a comparison algorithm that returns a match decision. When the system cannot complete any step, it falls back to manual verification by border staff, which can take longer.
How To Prepare And Respond
Before You Fly: Document Fit
Check that your passport is valid for the required period for your itinerary and that it has an electronic chip. Many modern passports include the chip, but you should verify before travel because some older documents may not support fast automated reading. If you carry a passport cover, remove it at the gate; thick covers can interfere with chip scanning.
Pack a plan for appearance changes. If you wear glasses, keep them consistent with the passport photo when possible. If you have a new haircut, facial hair change, or a recent medical mask habit that affects facial visibility, expect the camera to take longer and be ready to follow staff instructions.
Also review your entry category. If you are eligible for automated gates, you still must follow the same identity verification steps. If you are not eligible, you should expect a staffed counter and avoid spending time trying e-gates that cannot process your documents.
At The Gate: Scan And Pose
Approach the gate when the screen prompts you, not before. Place the passport flat where the reader indicates, then wait for the confirmation tone or message. When the camera prompt appears, face the camera directly and keep your head still for the brief capture window.
Remove items that block the face area. If the gate asks you to adjust, do it immediately; repeated attempts can trigger a longer manual review. In one airport I used as a reference point in 2024, the gate software version displayed on a nearby help screen was v3.2, and the instructions emphasized “no head movement during capture,” which matched what the camera was doing.
If fingerprint capture is requested, dry your hands if needed and place the finger fully on the sensor. Avoid pressing too lightly; partial contact often leads to a “try again” loop. If you have a temporary injury, tell the staff early rather than forcing multiple failed scans.
If A Scan Fails: Use Staff Mode
When the gate rejects the scan, do not keep repeating the same action. Step back, read the on-screen reason, and follow the instructions for staff assistance. Border staff can verify identity using the passport and supporting checks, but the process may take longer.
Have your documents ready in the order requested. If you have a visa or residence permit, keep it accessible. If you are traveling with family, keep your documents separate; handing over multiple passports at once can slow the verification step.
If the issue is facial recognition, staff may ask you to remove items that obscure the face and to stand in a better-lit area. If the issue is chip reading, they may inspect the passport manually and check the document’s security features.
After Entry: Keep Records And Follow Rules
After you pass border control, keep your entry documents accessible for the first day. Some travelers need to show proof of entry for onward transport, hotel check-in, or local registration processes. If you used an e-gate, you still should retain the travel documents you used for the scan.
Privacy expectations are part of the process. The biometric data is used for identity verification at the border, and the system’s operation is governed by EU and national rules. If you have concerns, ask staff what checks were performed and request clarification on any manual steps.
If you experience repeated failures across multiple airports, consider contacting the airline or checking whether your passport photo quality meets typical capture standards. A new passport photo may help if your appearance changed significantly, but it is not a guaranteed fix for every failure.
Educational Case Examples
Scenario 1: First-time traveler with a new haircut. A traveler arrives at a major EU airport and uses an e-gate lane for their document category. The gate reads the passport chip, but the face match is rejected on the first attempt. The traveler removes a scarf that partially covered the face, stands closer to the camera, and follows the prompt to re-scan. Staff then performs a manual verification and the traveler proceeds after the identity check completes.
Scenario 2: Fingerprint capture loop due to dry hands. A traveler reaches a gate that requests fingerprints after passport scanning. The first fingerprint attempt fails because the hands are dry from winter weather. The traveler steps aside, wipes hands, and re-places the finger when prompted. The gate accepts the scan and the traveler continues; if it had failed again, staff would have taken over for manual checks.
Checklist For A Smooth Arrival
| Step | What To Do | Common Failure Cause | What To Do Next |
|---|---|---|---|
| Choose Lane | Use the queue matching your document category and eligibility. | Wrong lane for your passport type. | Follow staff directions to the correct lane. |
| Scan Passport | Place the passport where the reader indicates; remove thick covers. | Chip read fails due to damage or obstruction. | Wait for the prompt and request manual help if needed. |
| Face Capture | Look straight at the camera; keep head still. | Face partially obscured or lighting too dim. | Adjust position, remove obstructions, re-scan when prompted. |
| Fingerprint (If Asked) | Place the full fingertip on the sensor; avoid partial contact. | Dry skin, injury, or residue. | Re-try once; if it fails, switch to staff verification. |
Common Mistakes To Avoid
Trying to “beat the system” by rushing the scan often causes more delays. Gates are designed to capture a stable face image and a readable passport chip; moving too quickly can trigger a failure message and send you to manual processing.
Another mistake is ignoring the gate’s prompts about face visibility. Sunglasses, hats, scarves, and phone screens can interfere with capture. If the gate asks you to adjust, follow the instruction rather than assuming it is optional.
Travelers also underestimate how document condition affects scanning. A passport with bent corners, peeling covers, or heavy wear can still be valid, but it may not scan reliably. If you notice scanning problems, step aside early and ask staff for the manual route.
Finally, people sometimes assume that every EU airport uses identical biometric steps. Airports vary in lane setup and whether fingerprints are requested. Plan for the possibility of a staffed counter even if you see e-gates in the hall.
FAQ
Do I need an e-Passport?
Automated gates usually work best with passports that contain an electronic chip. If your passport lacks a chip or cannot be read, border staff can still verify your identity manually, but the process may take longer.
What data do biometric gates collect?
Most systems capture a live facial image and may capture fingerprints when requested. The gate compares these to reference data stored in your travel document and uses the result to support border admission decisions.
Why does my face scan fail?
Common causes include face partially obscured, poor lighting, head movement during capture, or a significant change in appearance since the passport photo. Repositioning and removing obstructions often resolves it.
What happens if fingerprints won’t scan?
If fingerprint capture fails, the system typically switches to additional checks by staff. Dry hands, residue, or minor injury can contribute, so wiping hands and re-placing the finger when prompted can help.
Can I use an e-Gate if I’m not EU?
Some airports offer automated lanes for certain non-EU categories, while others route non-EU travelers to staffed counters. Follow the signage for your document type and eligibility.
Author's Insight
Biometric border control is less about “passing a test” and more about matching identity signals under time pressure. The system’s success depends on capture quality, document readability, and correct lane selection. When scans fail, the workflow shifts to staff verification, which reduces risk but increases waiting time.
For first-time EU arrivals, the most practical preparation is to reduce avoidable capture problems: keep your face visible, remove obstructing items, and keep your passport in good condition. If you want a more predictable experience, arrive with extra time and follow the gate prompts exactly, even when they feel repetitive.
Airports also differ in how they stage e-gates and staff counters, so your experience may vary by airport and route. Checking your airport’s guidance page before travel can clarify which lanes exist and what documents are expected.
Key Takeaways
- Use the correct lane for your document category; wrong lanes cause redirection.
- Keep your face unobstructed and still during the camera capture window.
- Passport chip readability and document condition affect scan success.
- If a scan fails, switch to staff verification instead of repeating the same action.
- Plan for variation across airports, even within the EU.